FAQs
Frequently Asked Questions
Setup
Elhi is purposely made to use 2.4Ghz instead of 5Ghz. Why? This is because Elhi needs a longer range and also has a very small data transfer requirement.
- Longer Range: 2.4 GHz band has a longer range and can penetrate solid objects more easily than the 5 GHz band, making it ideal for Elhi.
- Small Packet Size: With Longer Range we need to compromise on data transmission speeds. But Elhi doesn't need to get data from the internet, instead, it works on the LAN, thus very high speed data transfer is not required.
It's very easy to check if you have a 2.4 Ghz Wifi Connection.
Open up your WiFi menu on your computer and see if there are multiple options (SSID) with your WiFi's name.
- See if there are multiple similar network names (SSID), for example:
"elhi_wifi" and "elhi_wifi_5G"
"elhi_wifi" and "elhi_wifi 5.0"
"elhi_wifi" and "elhi_wifi5"
"elhi_wifi 2G" and "elhi_wifi" - If there are multiple similar networks, the one with either 2G, 2GHz, or nothing extra in the name is most likely the 2.4GHz WiFi network.
We would recommend you to connect to the Wifi and check through your computer settings. If you are using a Mac follow the below steps:
- Click on the WiFi icon in the top navbar while holding down the Option/Alt key.
- You will see detailed information in grey about your Wi-Fi. In the middle, it will show which channel your Wi-Fi is using.
- “Channel” will either say in the brackets 2.4GHz or 5GHz.
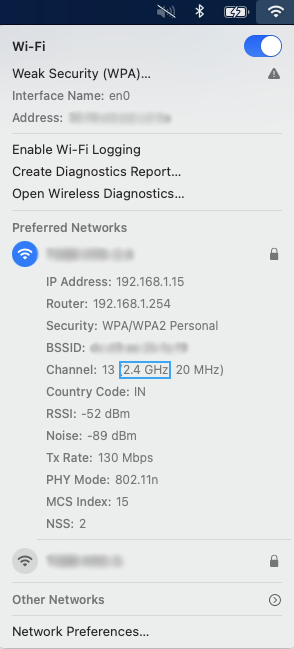
Image: Advanced Wifi Details in Mac.
Mostly Yes! In the current world scenario, most of the access point / wireless router manufacturers offer 2.4Ghz and 5Ghz band in the same hardware. This means that even though they appear as two different Networks on your computer, they are ideally the same LAN (Local Area Network). Thus you can in fact connect your Elhi to the 2.4Ghz network and your computer to the 5Ghz network.
Having said that, please note that in order to configure your Elhi device to the 2.4 Ghz network, you will first need to connect your computer to that Wifi so that the same appears in the configuration dropdown.
The Elhi sPresence Application only shows the Wifi Connections that your computer is already connected to in the past. If you want your Elhi device to connect to 2.4Ghz network while you work on 5Ghz one, you can surely do so. Please refer to the above question for more information on the same.
The serial number is important during the initial setup. The serial number of an Elhi device can be easily found from the Bluetooth name of the device. The number following the word "Elhi" is your serial number.
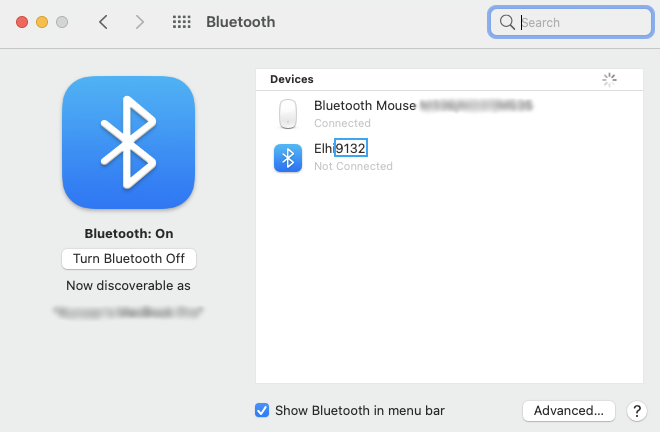
Image: Elhi's Bluetooth Name has the Serial Number. In the above example, the serial number of the Elhi device is "9132".
While connecting to Elhi for the first time, you will come across the below step. This step will come once you have configured the Wifi settings for your Elhi.
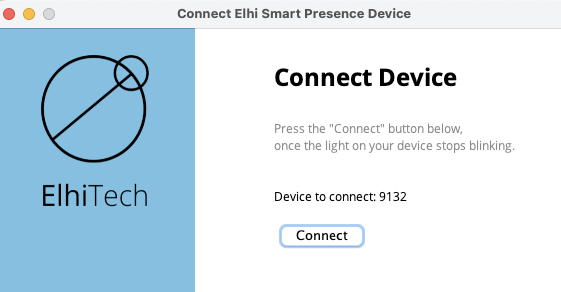
Image: Elhi Connecting Pane.
When you are on this pane, the Elhi device will be configured and will be trying to connect to the Wifi network. During this time it will be blinking (blue). Once the device is connected it will show a static blue light. In that case, you can simply press connect and you will be good to go.
But if the Elhi device goes blank (no light), restart your Elhi Device (without closing the application step). Wait for a few minutes, till the Device connects and shows the static blue light. Once you see the static blue light, click on connect. If even after restarting, the Elhi device is unable to connect (blinks for more than a few mins), restart your WiFi Router, the Elhi Device and the Application and start the configuration process again (as mentioned in the Getting Started guide). If nothing seems to be working, please contact Elhi Support.
If you are getting any error while connecting to Elhi, please follow the below guide.
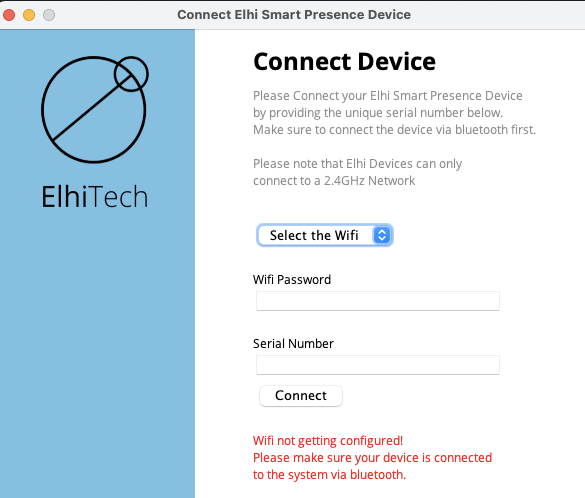
Image: Error at Configuration Step.
If you are getting the above error, it's possibly because the application isn't able to find your Elhi Device. As discussed in the Getting started guide, Elhi uses Bluetooth to configure the Wifi Settings for the very first time. So this can be fixed by checking that your Elhi is powered on and paired with your computer via Bluetooth. Even if it says not connected that should be okay. It should just be appearing on your Bluetooth pane. If you have tried everything and nothing seems to be working, we would advise you to contact us.
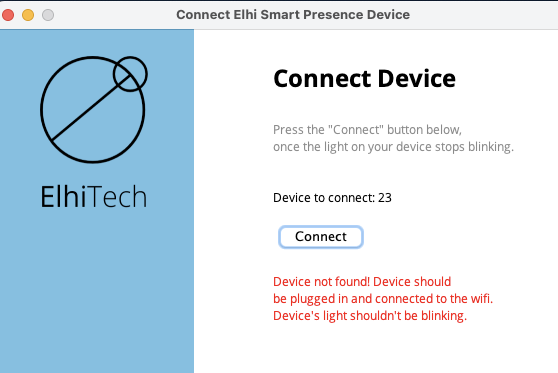
Image: Error at Connection Step.
If you are getting the above error, it's possibly because Elhi isn't able to connect to the Wifi or your computer isn't connected to the Wifi. Please make sure that your Elhi is powered on (showing static blue light) and your computer is connected to Wifi. If that doesn't resolve the issue, try restarting your Elhi Device and try again. If you have tried everything and nothing seems to be working, we would advise you to contact us.
Hardware
If you face a power cut, you don't have to worry. Elhi will automatically reconnect to the Wifi once the power resumes. If you try to change the status in the meantime, it will throw an error and will disconnect. You can simply reconnect your Elhi device from the connection menu. The device will be saved and can be easily connected to.
If you have connected to the Elhi device for the first time, you may need to restart your application to see the saved devices in the connection dropdown.
Elhi Devices and Adapters are tested rigorously before they reach you. Also, they are made with love to make sure they don't go bad so easily. But in certain cases due to rapid power fluctuations or age, the adapter might stop working. In such a scenario you can buy an Elhi replacement adapter from our online shop. You can also connect Elhi Support for more information on placing the order.
We would recommend you to use only Elhi original accessories to make sure that your Elhi device lasts longer. Using third party adapters might lead to the warranty being null and void. Please read the terms and conditions for more info.
As suggested in the update disclaimer and the update guide, please make sure that the Elhi Device is powered on and connected to your computer before updating the same. Power cut during the update can lead to bricking of the device. In such a scenario please reach out to Elhi Support.
If you are facing issues with Elhi and you aren't able to resolve them with the FAQs, please feel free to reach out to us. Our Support team will be always ready to help you when needed.
Software
No. Once configured, Elhi devices remember the wifi connection settings. The application also stores all your connected Elhi devices.
If you have connected to the Elhi device for the first time, you may need to restart your application to see the saved devices in the connection dropdown.
If your Elhi Device isn't changing status as per the VC platforms. Please make sure that your Auto Status Update settings are turned-on on the Preferences pane. Also, make sure that your Elhi Device is responding to manual status change. If everything looks okay, restart your application. If nothing seems to be working, please contact Elhi Support.
Please note that Elhi, by default, gives preference to the "Manual Busy". That means that if you have set the status as Busy manually, Elhi will keep the status as is even after coming out of the call. Example: If you set Elhi as Busy manually and after a while enter a call, the status will stay Busy. When you exit that call the status won't change back to Free, as you had manually set it to Busy. The same will happen if you set the status manually as Free and then Busy during the call.
If you want to change your Auto Status Update Settings. You can go to the Preferences pane. There you can select what all VC platforms would you like the Auto Status Update to work for. If you want to completely switch off the Auto Status Update, you can do so by deselecting all the VC Platforms.
Last Updated on: 1st June 2021